


Month: April 2016
Chef noels guest blog

check out my latest recipe for fish pie in a guest blog on
http://www.yummycafemarket.com/#!food-for-families/c19e1
#cubcakehour icing tips

1. Your icing will dry out very quickly so it is important to work quickly to avoid your icing becoming cracked and difficult to use
#CUPCAKEHOUR BAKING TIPS

1. Check that the shelves in your oven are in the correct position before turning on your oven. Bake your cake on the middle shelf, with the top of the cake sitting in the centre of the oven
Reality of chef life
by chef paul cotter (part 1)

Reality of chef life
Being a chef is not for the faint hearted or the easily offended. Being a chef is stressful, physically and mentally draining. We will work on average a 50 to 60 hour week on our feet all day using hot pans, ovens, grills, sharp knives (in most cases) and fire. So it is inevitable that we get cut and burned on a semi regular basis. Personally I constantly get little Knicks that you don’t notice until you go to season with salt and you get this stinging sensation in the top of your finger it didn’t hurt it’s just annoying at this stage for me.
Many of us in relationships have seen a fair share fail and those few lucky enough to find a woman/man that will stick through the absentee partner, being asked where is s/he and responding oh they are working.
However hard the kitchen life is, it is lessened when you have a good team to stand alongside for 50-60hours a week and a strong understanding partner, who reap rewards of really nice dinners on our time off. I suppose it’s the perks to being in a relationship with
a chef though we may not cook all the time, when we do cook you know it’s gonna taste good.
The important word here is team both in the kitchen and out of it, as the chef’s reading this will know it’s run like an army brigade in the respect that the head chef’s way is the only way for the establishment of a consistent standard of food that leaves the kitchen. Everything goes through the head chef you run out of something you suggest an alternative DO NOT change anything without letting them know 1st as they may have another item to use or already have the backup ready
tralee advertiser recipe

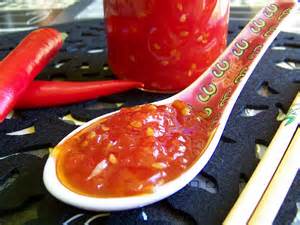
Gary’s Fiery Cajun Chicken with a Chilli and Lime Jam

Ingredients for Cajun Chicken
2 large Chicken supreme Breasts
Cajun Spices (Normal mix)
Cracked black pepper
Cayenne Pepper
Fresh Garlic 2 cloves
Diced Shallot
Olive oil 50ml
Crème Fraiche
Spring Onion
2 Large shots of Pernod
Ingredients for Chilli and lime Jam
1 Tin of Chopped tomatoes
1 clove of garlic
4 chilli peppers Red/Green
60g of brown sugar
30ml water
Zest and Juice of 3 limes
5ml Cider vinegar
1 shot of Jack Daniels
In a large bowl place the Chicken Breasts with the selected amount of each spice ( depending how hot you like it ) Then slowly add 50ml of Olive oil , Coat each Breast with the mixture and leave to marinate for up to 6 hrs or Longer in a fridge cover in cling film
After the Chicken has Marinated take a Hot pan and drain off a small amount of the marinate into the pan with the 2 cloves of crushed garlic and 2 diced shallots fry for 20 seconds then place the Chicken supreme’s skin side down in the pan seal both sides then place the Pernod into the pan an flame off the alcohol then place into the oven at 180C for 15 minutes . Finish with Chilli and Lime jam on top with some Crème fraiche and diced Spring Onion
Chilli and Lime Jam
Place all the ingredients into a thick bottom pot and slowly cook it out for 1 hour you may need to add more water to give a good consistency . After 1 Hour take off the heat and add the Jack Daniels and allow to cool . Keep in a fridge on till ready to use .
wild garlic and wild bay leaf soup with croutons and creme fraiche

recipe by Marcus “kitchen assassin” eidner
4 potatoes,
3 gloves garlic,
8 wild bay leaf,
2 sticks celery,
salt and pepper. Sweat it of in a pot. Add 2.5L veg stock, cook till soft. Take of heat, add around 1kg wild garlic, let sit for 5 minutes. Add crème fraîche and blitz. Season
. For the croutons: Slice baguette in thin slices and pan fry, salt and pepper.
More wild garlic can be used as you like

hake dish for tg4
POLISH CABBAGE ROLLS: GOLABKI

recipe by Anna “cookie” Kurdziel Tralee culinary gangster
also a blogger chef and writer check out annas blog http://www.anulaskitchen.com/
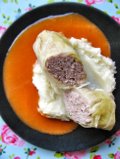
Golabki is a dish that’s very popular in Poland. They are great with mashed potatoes and thick, velvety tomato sauce. You can use raw meat, like myself, but I know that many Polish families will use cooked meat – from making a broth etc., hence making golabki very budget friendly dinner. You can serve them on its own – as you have all “ingredients” of a fully balanced dinner already there: meat, rice and veg 😉 Personally I think that simple, plain tomato sauce gives it another dimension, and its acidity goes really well with delicate cabbage.
Ingredients:
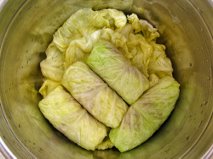
– 1 big savoy cabbage
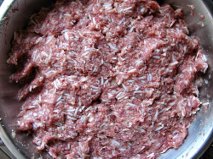
– 500 g minced pork (or 250 g minced beef + 250 g minced pork)
– 1 big white onion, finely diced
– 1 whole egg
– 1 cup boiled rice
– salt, pepper to taste
Method:
Put the whole cabbage into a big pot and cover with boiling water (but do not boil the cabbage!) and leave for few minutes. You want the leaves to soften and make it easy to work with them.
Mix the minced pork and beef (if using) with rice, egg, onion, salt, pepper and mix well together (I found it some time ago that it’s best to use your hands for that job).
Separate the leaves from the ‘head’ of the cabbage, trying not to tear them, and place them on a bog plate. Take a bit of the meat mixture (depending on the size of the leaf, it’s best to use a spoon for that) place the meat on the bottom end of the leaf and fold to form a little parcel.
Continue until you run out of the meat mixture and the cabbage leaves. You will be left with some small leaves, that won’t be good for making golabki, so just fry them quickly in a little but of butter – everything gets used here!
Take a big, tall pot and arrange a layer of those small fried leaves at the very bottom – this will prevent golabki from sticking to the pot. Layer your rolled golabki, making sure you put them in very tight. Pour water over the cabbage rolls to cover them completely, not over, but just so they’re all immersed in it. Cook golabki over a medium heat for minimum 1 hour – meat has to be cooked right through and cabbage leaves soft.
Tip: If you’re not sure about the meat mixture being seasoned properly, take a little pan and fry tiny burger and try before even forming golabki (1 tablespoon amount of the meat will be more than enough). That way you’ll know straight away if you need to add salt or pepper, or maybe you’ll want more onion in yours. It’s really a good idea and saves your golabki from turning out bland.
